How to Set Up Your BMON System
Getting Your BMON System Set Up
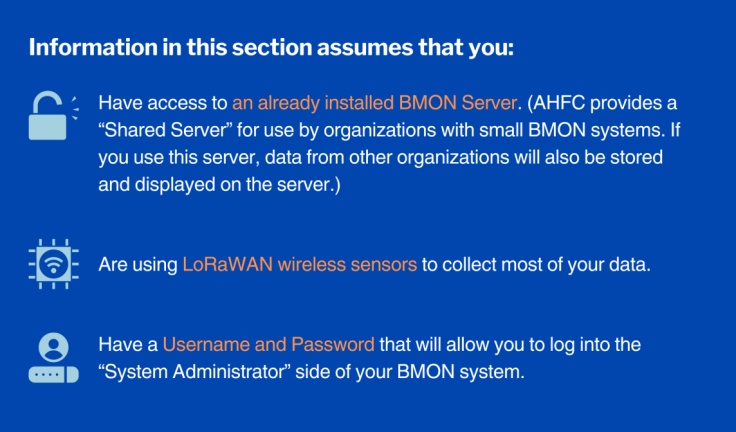
Sharing Your Configuration Data
Your configuration data will also be accessible to system operators from other organizations. Your other option is to install your own copy of the free BMON software on a Linux server you own or rent. “Cloud” Linux servers capable of running BMON can be rented starting at $6 per month (e.g., Digital Ocean, Linode).
The BMON User Interface vs the System Administrator Interface
Ways to Interact with the BMON Software
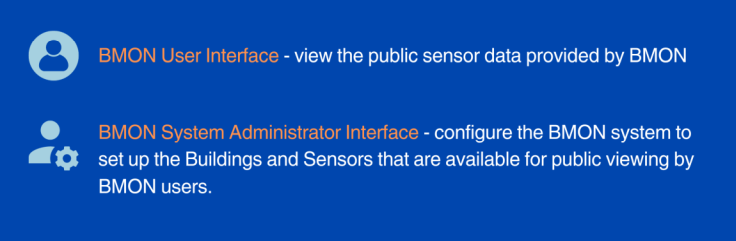
In this section, we will be using the System Administrator interface to set up the building and sensors that are used in your BMON system.
LoRaWAN Wireless Sensor Configuration
The LoRaWAN wireless sensors used in this section must be set up to deliver their data to the publicly-available Things Network. The account on the Things Network that receives the data must be configured to forward it to your BMON server. For the rest of this section, we will assume that this configuration is in place.
How to Configure Your LoRaWAN Wireless Sensor
We expect that Alaska sensor suppliers will perform this configuration for you, but if you receive an unconfigured sensor, Appendix- Configuring LoRaWAN Sensors gives details on how to configure the sensor and the Things Network to ensure the sensor data is received by your BMON server.
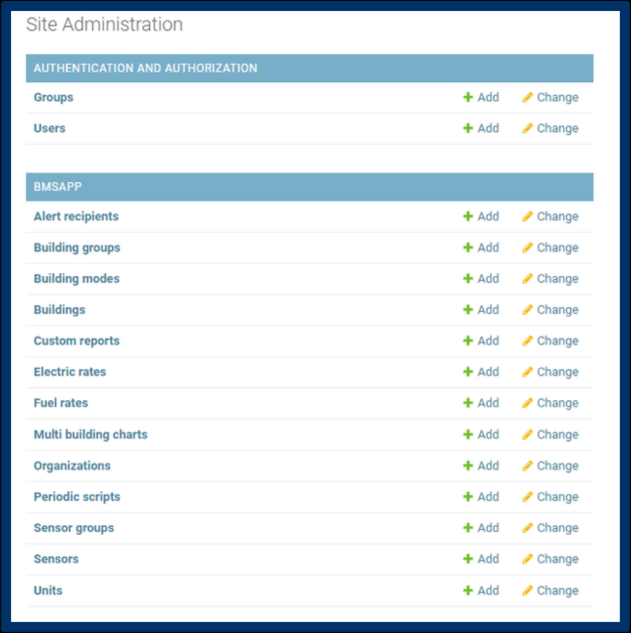
Overview of the System Administrator Interface
A View of the BMON System Administrator Interface
Steps to Access the Administrator Interface
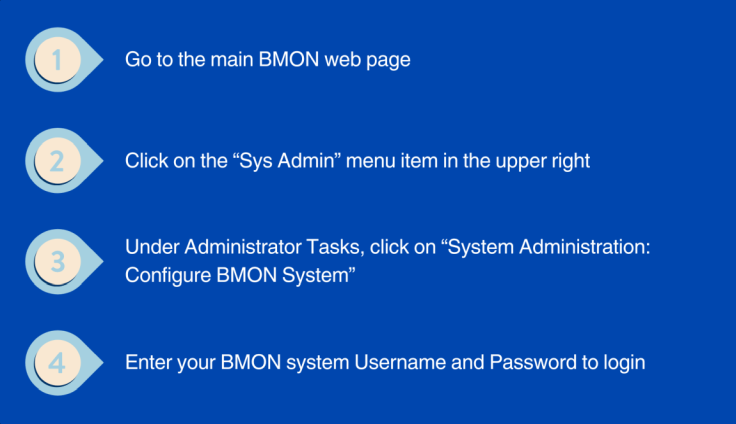
This video shows how to access the System Administrator interface and gives an overview of how the interface is used:
Video: System Administration Interface
Remember that if you are using the Shared AHFC BMON System, you have access to other organizations’ building and sensor configuration. So, be careful to only edit your data.
Adding a Building
In BMON, sensors are associated with buildings.
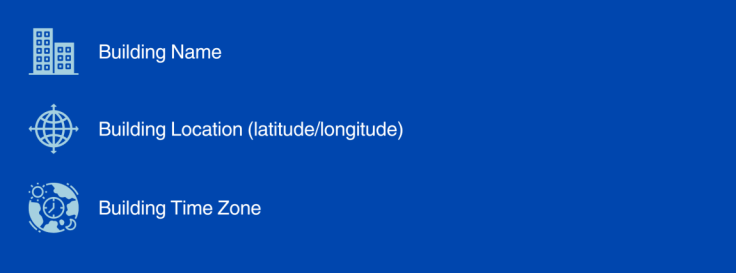
Essential Information Needed to Add a Building in BMON
See how to add a new building into the BMON system in the video below. If you are using the AHFC Shared BMON system, this video also shows how you can connect the building to your ‘Organization’ on the shared BMON server.
Video: Basic Information for Adding a New Building into BMON
Adding More Detailed Information
More detailed information can be entered for a building to make the User Interface more useful, but that is optional.
Examples of Building Details That Can Be Entered in BMON

View the video below to see how to set up some of these optional features:
Video: Advanced Building Information; Occupied Schedule & Additional Description
A later section, How to Use the BMON Sensor Data- Analyzing Data: Energy Reports, will show how to fill out the building fields that are necessary if you want to use the “Energy Reports” feature of the BMON system. Energy Reports are very useful for finding possible energy savings, so this task should be completed.
Adding a Sensor and Assigning it to a Building
Once you have your buildings added to BMON, you can then add the individual sensors that report sensor readings.
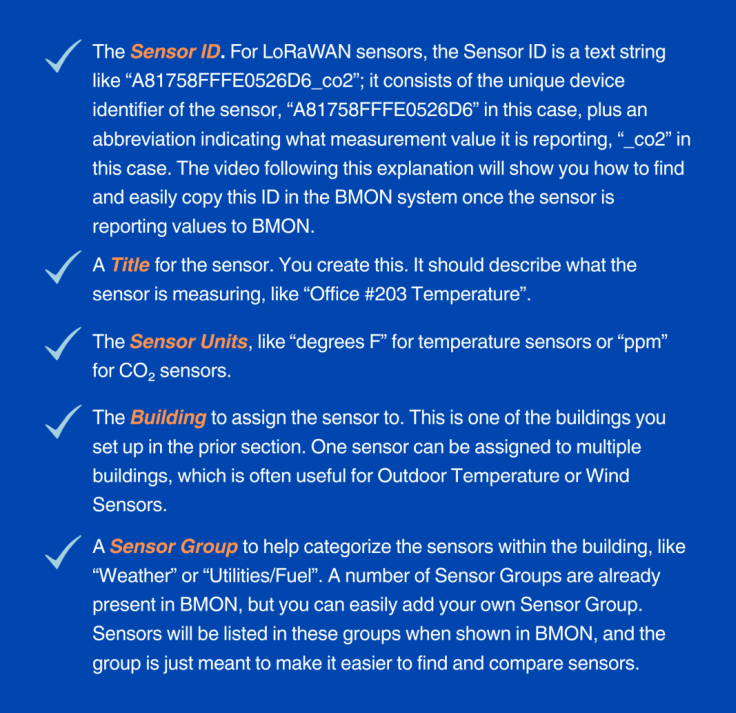
Information Needed to Add a Sensor to the BMON Software
It is also important to understand that one physical sensor device, like an Elsys ERS-CO2 sensor, will report multiple different sensor values, such as CO2, temperature, light, humidity, and motion. Although these different values are coming from one sensor in the field, they need to be set up as separate sensors in BMON.
Click below for a description and a video on how to set up LoRaWAN wireless sensors. This will also help you configure other sensors, such as Monnit wireless sensors or values reported by a Raspberry Pi, since both are configured in the same way as the LoRaWAN wireless sensors.
Setting Up Separate Sensors in BMON
For the ERS-CO2 example just mentioned, if you are interested in looking at all five reported values, you would set up five different sensors in BMON. There is a unique Sensor ID for each of the values, e.g. “A81758FFFE0526D6_co2”, “A81758FFFE0526D6_temperature”, etc. The video below shows you how to find the Sensor IDs for sensors that are reporting into the BMON system, but have not yet been set up in the system.
Video: How to use Unassigned Sensors when Setting Up New Sensors
This video walks through the process of setting up a Sensor in BMON and assigning it to a Building and to a Sensor Group within that Building.
Video: Basic Steps for Adding a New Sensor
Editing Information for an Existing Sensor
Sometimes it is necessary to edit information from an existing sensor. Because the list of sensors in a BMON system can become very long (especially on the AHFC Shared System), it is useful to know how to easily find a particular sensor. The video below shows you how to filter the list of sensors by building and shows you how to search for a particular sensor.
Video: Editing Sensor Information
Adding Weather Data from the Internet
In BMON, a “Sensor” is not necessarily a sensor that you own. One example of this is a National Weather Service (NWS) Outdoor Temperature “Sensor” that BMON accesses from across the Internet. Weather data sensors can be set up once and used by multiple buildings that are near the weather station.
This video demonstrates how to set up an Outdoor Temperature Sensor by accessing National Weather Service data, available without any fees.
Video: Getting National Weather Service Temperature and Wind Data
More extensive sets of weather data beyond what the NWS provides are available online. Important: The “Calculated Field” checkbox in the sensor setup screen needs to be marked when gathering weather data from the internet.
Other Types of Calculated Fields
Other types of Calculated Fields are available. For example, you can create a sensor that is the sum of a couple of other sensors, like when you want to be able to see the total electric use of a building that has two electric meters. Most other types of calculations to create a new sensor are available. However, we will not dive into this deeper in this section. If interested, more detail on Calculated Fields is available online.
Assigning Sensors used by Energy Reports
Energy Reports are one of the data analysis tools that BMON provides. These reports provide graphs and information that help you identify possible energy savings opportunities in your buildings. Click below for additional explanation on Energy Reports and go to this section for far more detail.
Setting Up Key Sensors for Energy Reports
When an Energy Report is being created, it needs to be able to identify energy-related sensors in each building. If you want to use this important Energy Report feature, you need to make these identifications for each building. For example, you need to indicate which sensors are measuring the indoor temperatures in the building, which sensor measures the outdoor temperature, which sensor is the building’s electric power sensor, etc. The following video shows how to do that:
Video: Identifying & Entering Key Sensors for Energy Reports
Creating a Dashboard
A dashboard provides a glimpse into the operations of a building by showing current values of certain sensors. Typically the dashboard only shows a few sensors, in the form of dials, charts, and indicators, rather than the whole list of sensors for a building.
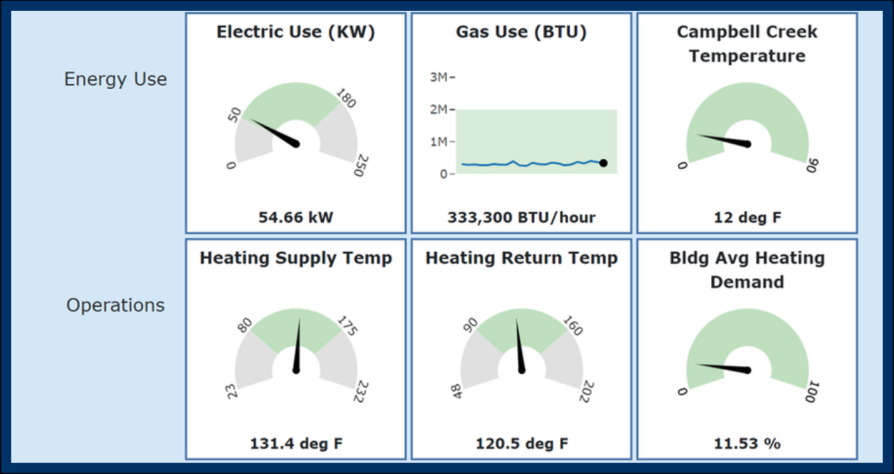
Example of AHFC Headquarters Dashboard
The way a dashboard is set up will also depend on the goals of the person or team that will be using it - maybe the goal is saving energy, maybe it is keeping a building from freezing up, maybe it is maintaining healthy and comfortable conditions for occupants and reducing complaints, or it could be a combination of goals. The dashboard can be set up in different ways to serve different goals.
The Dashboard for the AHFC Headquarters Building Illustrates Some
Options of What Can Be Displayed
Guidelines for a Useful Dashboard
Considerations and Tips for Setting up a Useful Dashboard

Video: Choosing Sensors to Display on the Building Dashboard
Video: Adding Custom Reports and Links to the Dashboard
Using and Creating Alerts
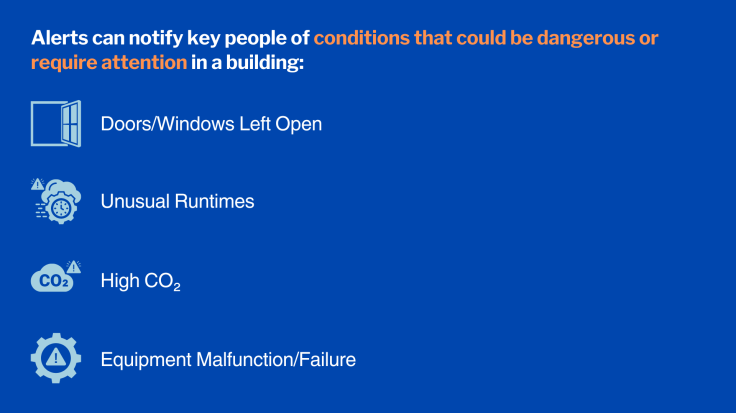
Examples of What to Use Alerts for in BMON
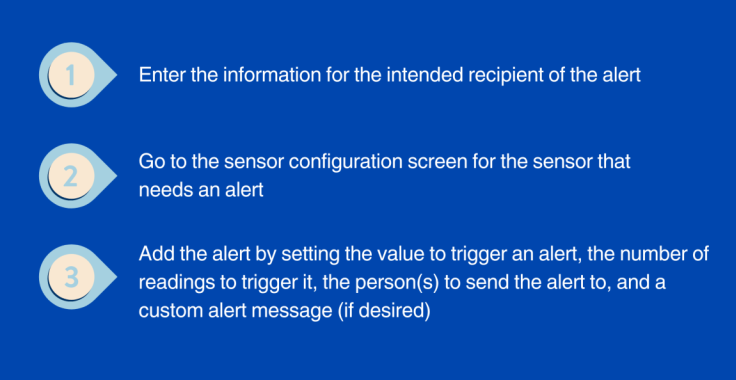
An alert is a function that sends a message when a sensor’s reported value is outside the range that was established as normal. To create an alert, follow these steps or view the video below:
How to Create an Alert
Video: Creating Alerts and Assigning Recipients
[** Video 3.8 needs to be updated to include new features**]
Editing and Cleaning Sensor Data
Sometimes bad data is stored by a sensor, perhaps because of a sensor error or because the sensor was sending data while not fully installed. Removing these data points is an important task. Also, you may want to entirely remove a sensor and its readings from BMON. You can accomplish these tasks by using BMON’s Sensor Data Utilities, found under the “Sys Admin” menu in BMON. The video below explains how to use the utilities:
Video: Sensor Data Utilities
If you need to delete a sensor that does appear in the main BMON interface, you can do this by use of the “Unassigned Sensors” page, also available under the “Sys Admin” menu item.