Appendix: Configuring LoRaWAN Sensors for BMON
Introduction
This page shows how to:
-
Register a LoRaWAN sensor on the Things Network, the freely available network of servers that can accept sensor readings and forward them to BMON. This section assumes that there already is a Things Network account set up, and that there is an Application set up in that account that has the proper Integration for forwarding sensor readings to BMON.
-
Configure Elsys and Dragino sensors for use with your Things Network account and BMON.
Registering Sensors on the Things Network
Expand the section below to find details on how to register a LoRaWAN sensor on the Things Network. This process may have already been done for you if you have received the sensor from the Alaska Housing Finance Corporation.
Registering a Sensor on the Things Network
Once an Application on the Things Network has been set up to receive sensor readings and forward them to BMON via an HTTP Integration, individual sensors must be registered with that Application.
This Video by Things Industries shows how to create an Application and manually add Devices to that application. Note that Application creation for the BMON Application should already be done, so that portion of the video is not important. Also, the video talks about adding a Payload Formatter to a Device; this also is not needed as the payload data from the sensor is decoded and formatted inside of BMON, not in the Things Application.
Adding a Device
For both the Elsys and Dragino sensors discussed in this document, here are screenshots of critical settings (but not all settings) when manually adding a Device:
Screenshot of Activation, Version, and Network Settings
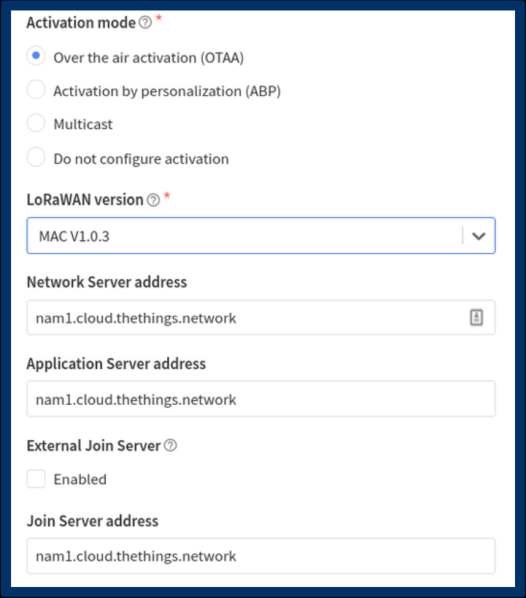
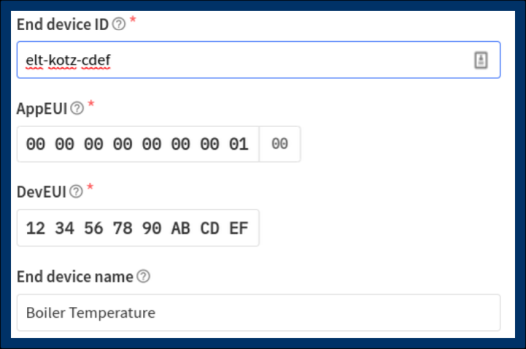
For the “End device ID” shown below, you must create an ID that starts with a code indicating the model of sensor. For the sensors known by BMON, here are the codes:
ers : Any of the Elsys ERS sensors
elt: Either the Elsys ELT-Lite or the ELT-2 sensors
lht65: The Dragino LHT65 sensor
ldds: The Dragino LDDS20 or LDDS75 liquid level and distance sensors
lwl01: The Dragino LWL01 Water Leak Sensor
Screenshot of Device ID
Screenshot of Frequency Plan

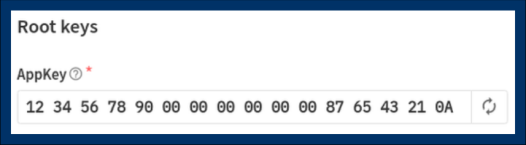
Screenshot of Root Keys
The simplest way to enter a batch of Elsys sensors is to use the Elsys-to-Things Tool. This web application has you upload the CSV order file that Elsys provides with each order; this file contains the critical IDs and keys for each of the sensors. The Elsys-to-Things tool can then create a JSON file of the proper format to upload to the Things Console at this “Import end devices” link on the End Devices page in the Things Console:
Import End Devices link on the End Devices Page

The full batch of sensors will be entered into your Things Account at one time.
Configuring an Elsys Sensor
A LoRaWAN sensor needs to be configured in order to tell it a number of things:
-
How frequently to report its readings.
-
What type of external sensor is connected (e.g., temperature, pulse, switch)
-
What frequencies the sensor should operate on.
-
Other settings related to the LoRaWAN network it is working with.
Many of these settings can be configured at the Elsys factory if you request to do so with your order. There is a 1 EU charge per sensor for orders less than quantity 100.
Even with factory configuration, adjustments to settings often need to be made. Elsys sensors such as the ERS or ELT-Lite are configured through use of an Android or Apple phone (in the respective App Stores, search for “Elsys” to find the “Sensor settings” app). Settings are entered into the phone application, and then the phone is “bumped” against the sensor to transfer the settings (this is the conventional NFC phone tap technology used to make payments at a store or restaurant). Some inexpensive Android phones may not have NFC technology so will not work with the Elsys app. Some relatively inexpensive Android phones that do have NFC capability from vendors like Amazon are: Nokia 7.1, Ulefone Armor X7 Pro, Cubot Note 20 Pro, Blackview BV5500. You do not need to buy a cellular plan to use the phone, as you can connect the phone to Wi-Fi and download the necessary app.
When using the Elsys Sensor App, there are three modes of operation; the “Advanced” mode, which is selected by the lightning bolt icon on the top row of the App, is used here. To start the process of configuring a sensor, you first tap the phone to the sensor to read in the existing sensor settings. Then you adjust those settings as needed. The video below shows how to use the Elsys Smartphone App to configure sensors.
Video: Configuring Elsys Sensors with your Smartphone
Your sensor supplier may have most of the following settings already configured when you receive the sensor. However, you still may need to adjust some of the settings described below, including how frequently the sensor reports its readings and what type of external sensor is connected. The following screen captures explain the important settings in the App.
Screenshot of Sensor, Timebase, and External Sensor Settings in the Elsys Sensor App

The first three settings are Sensor, Timebase, and External sensor. The Sensor setting was read from your actual unit and should be correct. Timebase should be set according to how frequently you want readings posted to BMON. The setting is measured in seconds, so the 600 value shown here means readings will be posted every 10 minutes.
The sensor used in this example is an ELT Lite sensor, which has terminals to connect an External sensor. The type of External sensor should be selected in the drop-down. See the Elsys Manual for a full description of the options, but here are commonly used selections for BMON:
-
Analog 0-10V: Used for a sensor that puts out a 0 - 10 VDC output signal, like a pressure sensor.
-
Analog 0-3V: Used for sensors that output a lower range of voltage, less than 3 Volts. This is also the correct selection when reading a 4 - 20 mA current sensor that is converted to a voltage through use of a 150 Ohm resistor across the IN and ⏚ ground terminal.
-
Absolute Pulse Input, pull up: Used when connecting to a device that outputs “dry” (switch closure) pulses, such a pulse output on a gas meter or a KYZ pulse output unit on an electric meter.
-
1-wire Temperature probe: Used when you connect an external temperature probe, either available through Elsys or through vendors such as Amazon (see these probes).
-
Switch: Used when sensing whether a switch or a relay is closed.
-
Switch, dual edge trigg: This is the correct setting to use with a switch or the Analysis North Motor Sensor when you want to receive a sensor reading both when the switch closes (motor turns on ) and when it opens (motor turns off).
Screenshot of Period Settings in the Elsys Sensor App

For these settings, the “period” settings are important. These determine which sensor readings will be included when a transmission occurs. So, to receive the External Sensor reading, you must set External period to 1 (it defaults to being set to 0). If you want to receive a reading of the sensor battery voltage, Battery period should be 1, which is the default. Send period also defaults to the correct value of 1, which says to send a sensor transmission at an interval of 1 times the Timebase value you set on the prior screen.
Another sometimes important setting on this screen is the External startup time. If you are using an External sensor that needs to be supplied power through the B+ terminal of the ELT sensor, you need to put a positive value in External startup time. The value is expressed in milliseconds and it tells the ELT sensor how early to apply power to the External sensor before reading it. Some sensors need time to “warm up” before being read, so may need a few hundred milliseconds of power before being read. For the Analysis North Motor Sensor, the sensor must be continually powered, so enter in a large number like 10 million into the cell (10000000, with no commas).
Screenshot of Sensor Keys Settings in the Elsys Sensor App

The Sensor keys section contains two important identifying numbers that will be used when registering this sensor on the Things Network. Nothing needs to be changed, unless the App EUI is set to all 0s and you will try to register the Device on version 2 of the Things Network. On that version, a 0 App EUI is invalid; for version 3 of the Things Stack, all 0s is a valid entry. The App EUI should be set to a simple number, like 0000000000000001, and just needs to match what is set when you register the device on the Things Network.
If you will use the Multiple Write feature (described later) to configure a number of different sensors, it is very important to collapse the Sensor Keys section so these values will not be included in the Multiple Write operation. They are ID values for this one sensor and should not be written to other sensors.
Screenshot of LoRaWAN Configuration Settings in the Elsys Sensor App

These are the default settings for OTAA and Confirmed message and are the correct values for our application. Frequency plan and Sub-band must be set to the values shown above; these values set the Elsys sensor to operate on the correct frequency band.
Screenshot of Extended LoRaWAN Configuration Settings in the Elsys Sensor App

Default values are OK here except for the three Datarate settings. The sensor datarate affects how far the sensor can transmit–the lowest datarate, DR0, gives the sensor the longest range, but at the expense of battery life. The settings shown above allow the Things Network to remotely adjust the datarate of the sensor according to how strong the received signal is. For the settings shown, the network will be allowed to adjust the datarate between DR0, DR1, DR2, and DR3.
If you know you have a large distance to cover, it is advisable to lock down the datarate to the DR0 setting, ensuring the best chance for sensor reading success. You do this by setting Datarate default, Datarate max, and Datarate min to the value of DR0.
Use of the ERS CO2 or VOC sensor is a special case. Because these sensors produce so many different readings (temperature, light, motion, humidity, CO2), they are not supported at datarate DR0 in the United States because of the large data payload size. For these sensors, the Datarate default and Datarate min must be set to DR1 at the lowest.
No other settings need to be modified on the Elsys sensor. To write the new settings to the sensor, first make sure that all the sections where you changed values are open and not collapsed, then you click the WRITE button at the bottom of the screen and tap the sensor. Further explanation is available in the appropriate Elsys manual.
The Elsys Sensor App has a time-saving feature called Multiple Write. You can turn this feature On from the drop-down menu in the upper left of the App (three horizontal bars). With this feature On, you can write the same settings to multiple sensors of the same type (e.g. ELT-Lite or ERS CO2). It is very important that you do not have the Sensor keys section open when you click the WRITE button. That section includes the AppKey, which is unique for each sensor and should not be changed.