Appendix: Configuring Dragino LoRaWAN Gateways
Dragino makes a few different LoRaWAN gateways, including the LPS8N and the outdoor DLOS8. This section gives some notes on how to configure these gateways. Full documentation for each gateway is on the Dragino website and should be consulted for detailed information.
When you power up the gateway, it broadcasts a new Wi-Fi network that you can connect to with a PC (just like connecting to a Wi-Fi network at a coffee shop). The network name always starts with “dragino,” for example “dragino-1eb408.” The last five characters of the network name are the last five characters of the Gateway ID, which is found on the bottom of the gateway and on box the gateway was shipped in. The Wi-Fi password for connecting to this network is “dragino+dragino.”
Next, you need to use a web browser to access the configuration web pages located on the gateway. You access those pages by typing in the following IP address into the address bar of your browser: 10.130.1.1. The first time you try to access this address, a dialog will pop up requesting you to log in. For this log in, the username is “root” and the password is “dragino.” You are then presented with the following system diagram:
System Diagram for Dragino LoRaWAN Gateway
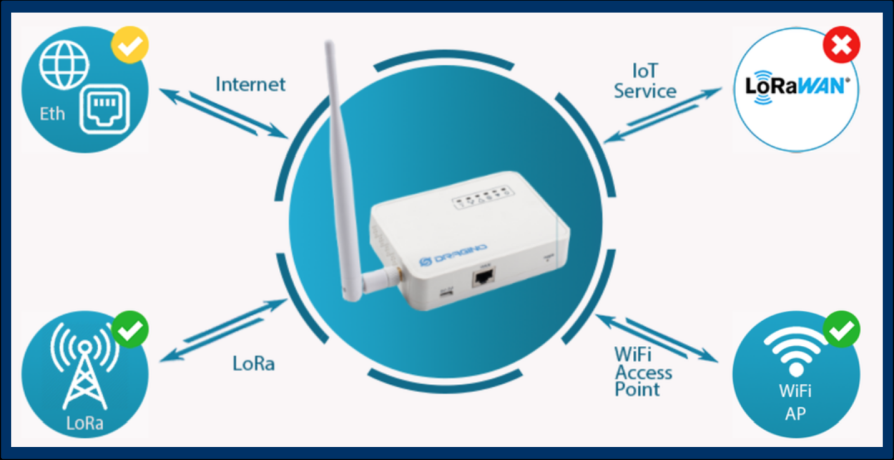
which generally displays which parts of the gateway are working. Access to different configuration pages can be done by clicking on parts of the diagram or by using the menus at the top of the page.
Configuring a Gateway for the Things Network
Here are the key settings that need to be changed to configure the gateway for US operation on the Things Network:
-
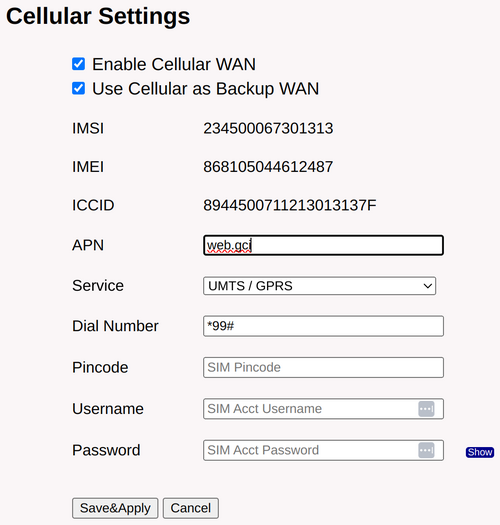
Determine how the gateway will be connected to the Internet. If you will be connecting with a wired Ethernet cable, you do not need an Ethernet-related configuration on the gateway, and you can move to the next step. You also have the ability to connect the gateway via WiFi to the Internet, but we prefer Ethernet if possible. If you do choose to use a WiFi connection, see the notes at the end of this Appendix. If you have a gateway that supports a cellular connection to the Internet (a SIM card slot will be on the side of the gateway), you need to access the “Network” menu and click the “Cellular” option. Then, check the “Enable Cellular WAN” checkbox and enter the cellular carrier’s APN in the “APN” box. The APN for the GCI carrier is “web.gci”. Your configuration should look like the following:
Screenshot of Cellular Settings
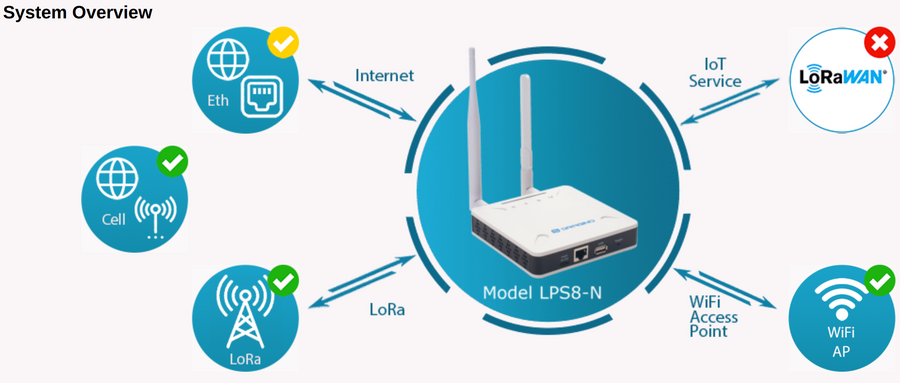
Click the “Save&Apply” button at the bottom of the page. If you now go back to the Home screen by clicking the “Home” menu item, the diagram will look like this after waiting 30 seconds or thereabouts for a connection to the cellular network:
Screenshot of Home Screen with Cellular
-
From the “LoRa” menu, click the “LoRa” item. Change the Radio Settings section to look like the following:
Screenshot of LoRa Radio Settings

Click the “Save&Apply” button at the bottom of the page.
-
From the “LoRaWAN” menu, click the LoRaWAN – Semtech UDP” item. Copy and save the Gateway EUI from the General Settings section, as you will need this later when you register this gateway on the Things Network. Do not change the EUI. This string is also printed on the bottom of the Gateway and on the box that the gateway came in.
Screenshot of Gateway EUI

Then set the “Primary LoRaWAN Server” as follows:
Screenshot of Primary LoRaWAN Server

Click the “Save&Apply” button at the bottom of the page.
-
You then need to register the gateway on the Things Network through the Things Console. The important settings there are the “Gateway EUI”, which is the “Gateway EUI” that we copied in a prior step. Also, the frequency plan must be set correctly. Here is a screen shot of a properly configured gateway:
Screenshot of Gateway configuration on Things Network

-
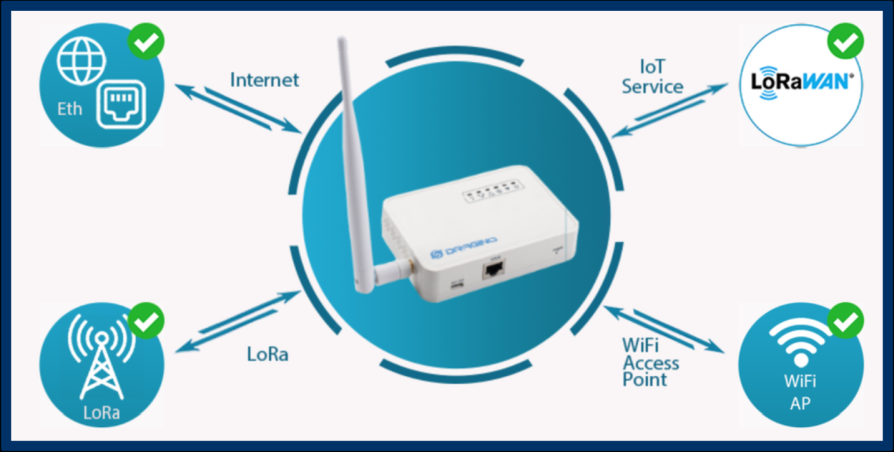
Unplug and then re-power the gateway. If you reconnect to the gateway’s Wi-Fi network and visit the home page at 10.130.1.1, you should see green checkmarks:
System Diagram for Dragino LoRaWAN Gateway with Green Checkmarks
Notes on Connecting the Gateway to the Internet with WiFi
If you want to use Wi-Fi to connect the gateway to the Internet, then you need to access the “Network” menu and click “WiFi.” On the WiFi page, you must fill out the settings in the “WiFi WAN Client Settings” section of the page, making sure to “Enable WiFi WAN Client” and to properly fill out the name of the Wi-Fi network (SSID) and the Passphrase. Also, keep the “Enable WiFi Access Point” checkbox enabled so that you can access the gateway in the future for configuration (i.e., make no changes in that section). Click the “Save&Apply” button at the bottom of the page to save the changes.
Note one issue we have discovered with filling out and enabling the “WiFi WAN Client Settings” section: if that particular Wi-Fi connection is not available, an Ethernet connection will also not work. If you use Wi-Fi for testing the gateway but ultimately intend to use an Ethernet connection, make sure you disable the Wi-Fi WAN Client.